In the rapidly evolving landscape of digital art, creating visually striking and intricate 3D environments remains one of the most formidable challenges for modern digital artists. The demand for hyper-realistic, yet emotionally evocative fantasy and sci-fi vistas continues to grow across the entertainment, gaming, and cinematic industries. To demystify this complex pipeline, acclaimed freelance sci-fi and fantasy artist Calder Moore has shared an exhaustive, step-by-step masterclass detailing his proprietary workflow for constructing sweeping, photorealistic landscapes.
Originally published in ImagineFX, Moore’s masterclass breaks down the intimidating prospect of building vast 3D environments into manageable, bite-sized production phases. Utilizing an industry-standard software stack—including Cinema 4D, ZBrush, Octane Render, and Adobe Photoshop—Moore demonstrates how technical efficiency, smart asset management, and creative adaptability can converge to produce breathtaking results. This article explores Moore’s comprehensive methodology, examining how foundational sketching, procedural blockouts, advanced displacement mapping, and meticulous post-processing elevate digital environment creation from a technical chore into a refined artistic endeavor.
Detailed Chronology: From Concept to Polished Masterpiece
Building a detailed 3D environment requires a structured pipeline to prevent the artist from becoming overwhelmed by technical hurdles. Moore’s workflow is a testament to the power of methodical planning, divided into fourteen distinct stages spanning ideation, 3D execution, rendering, and digital retouching.
Phase I: Ideation and Blocking
01. Making a Thumbnail Sketch
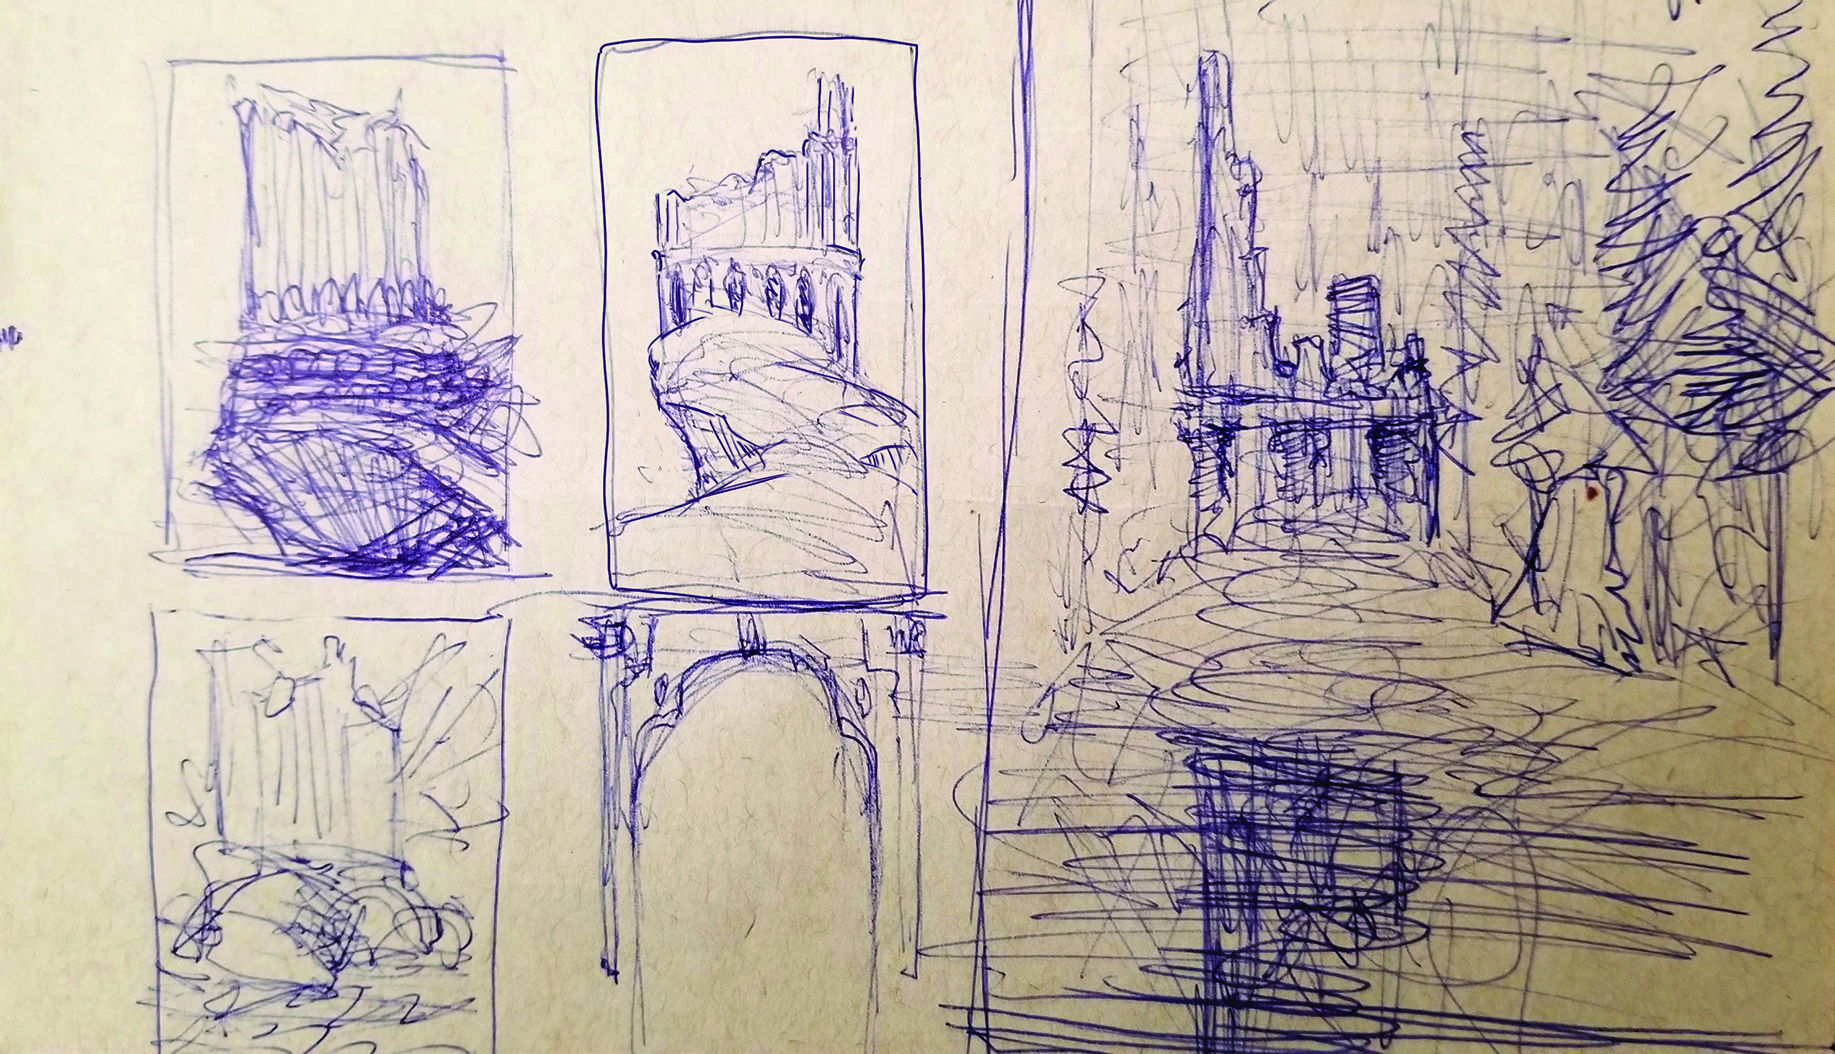
Every great environmental render begins with a clear narrative direction. Moore initiates his projects with rapid thumbnail sketches. This preliminary stage allows him to iterate quickly across multiple compositional ideas, testing different visual flows and establishing the desired mood. For this specific project, the goal was to evoke an "epic tower with the feeling of lonely, forgotten ancient power." By keeping sketches loose and exploratory, the artist avoids premature attachment to intricate details, focusing instead on pure composition and storytelling potential.
02. Blocking the 3D Scene
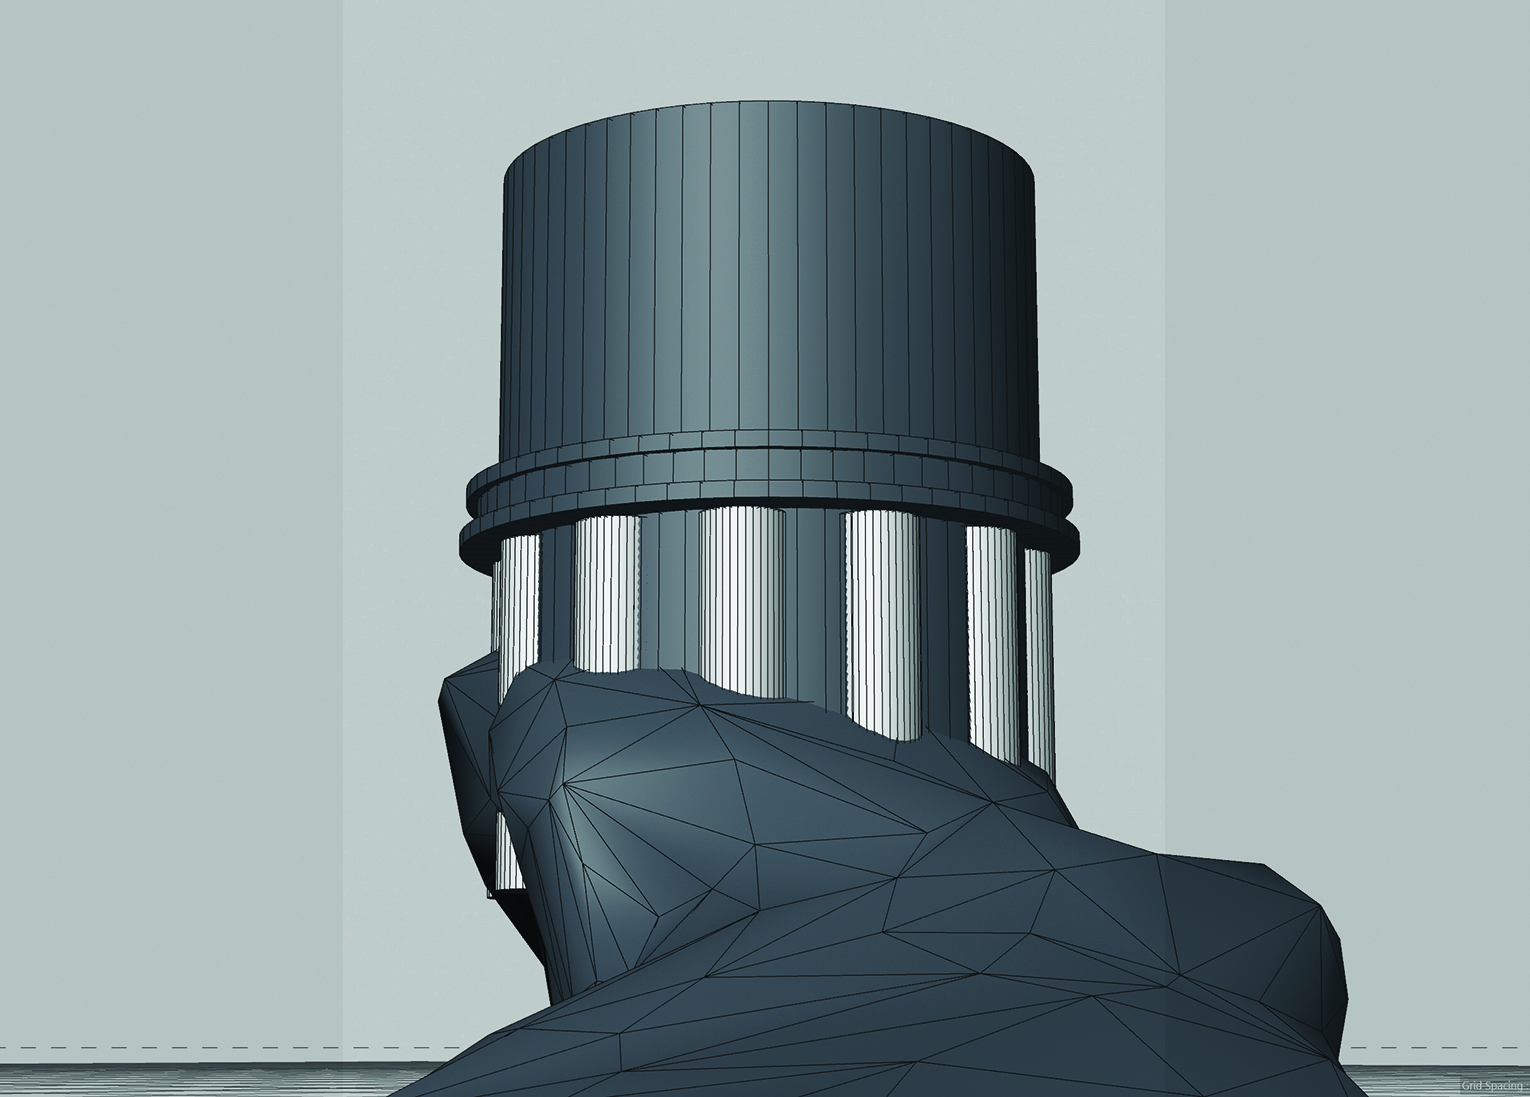
Transitioning from 2D to 3D, Moore imports his composition guidelines into Cinema 4D. Here, he establishes the foundational layout of the world. Using basic primitive geometry and fundamental sculpting tools, he roughs out the broad landmasses and the overarching silhouette of the central tower. Crucially, this stage involves locking down the camera position early. Securing the focal lens and framing dictates all subsequent detailing, ensuring that computational power and artistic effort are directed exclusively toward what is visible within the final frame.
Phase II: Architectural Modeling and Destruction
03. Building the Tower
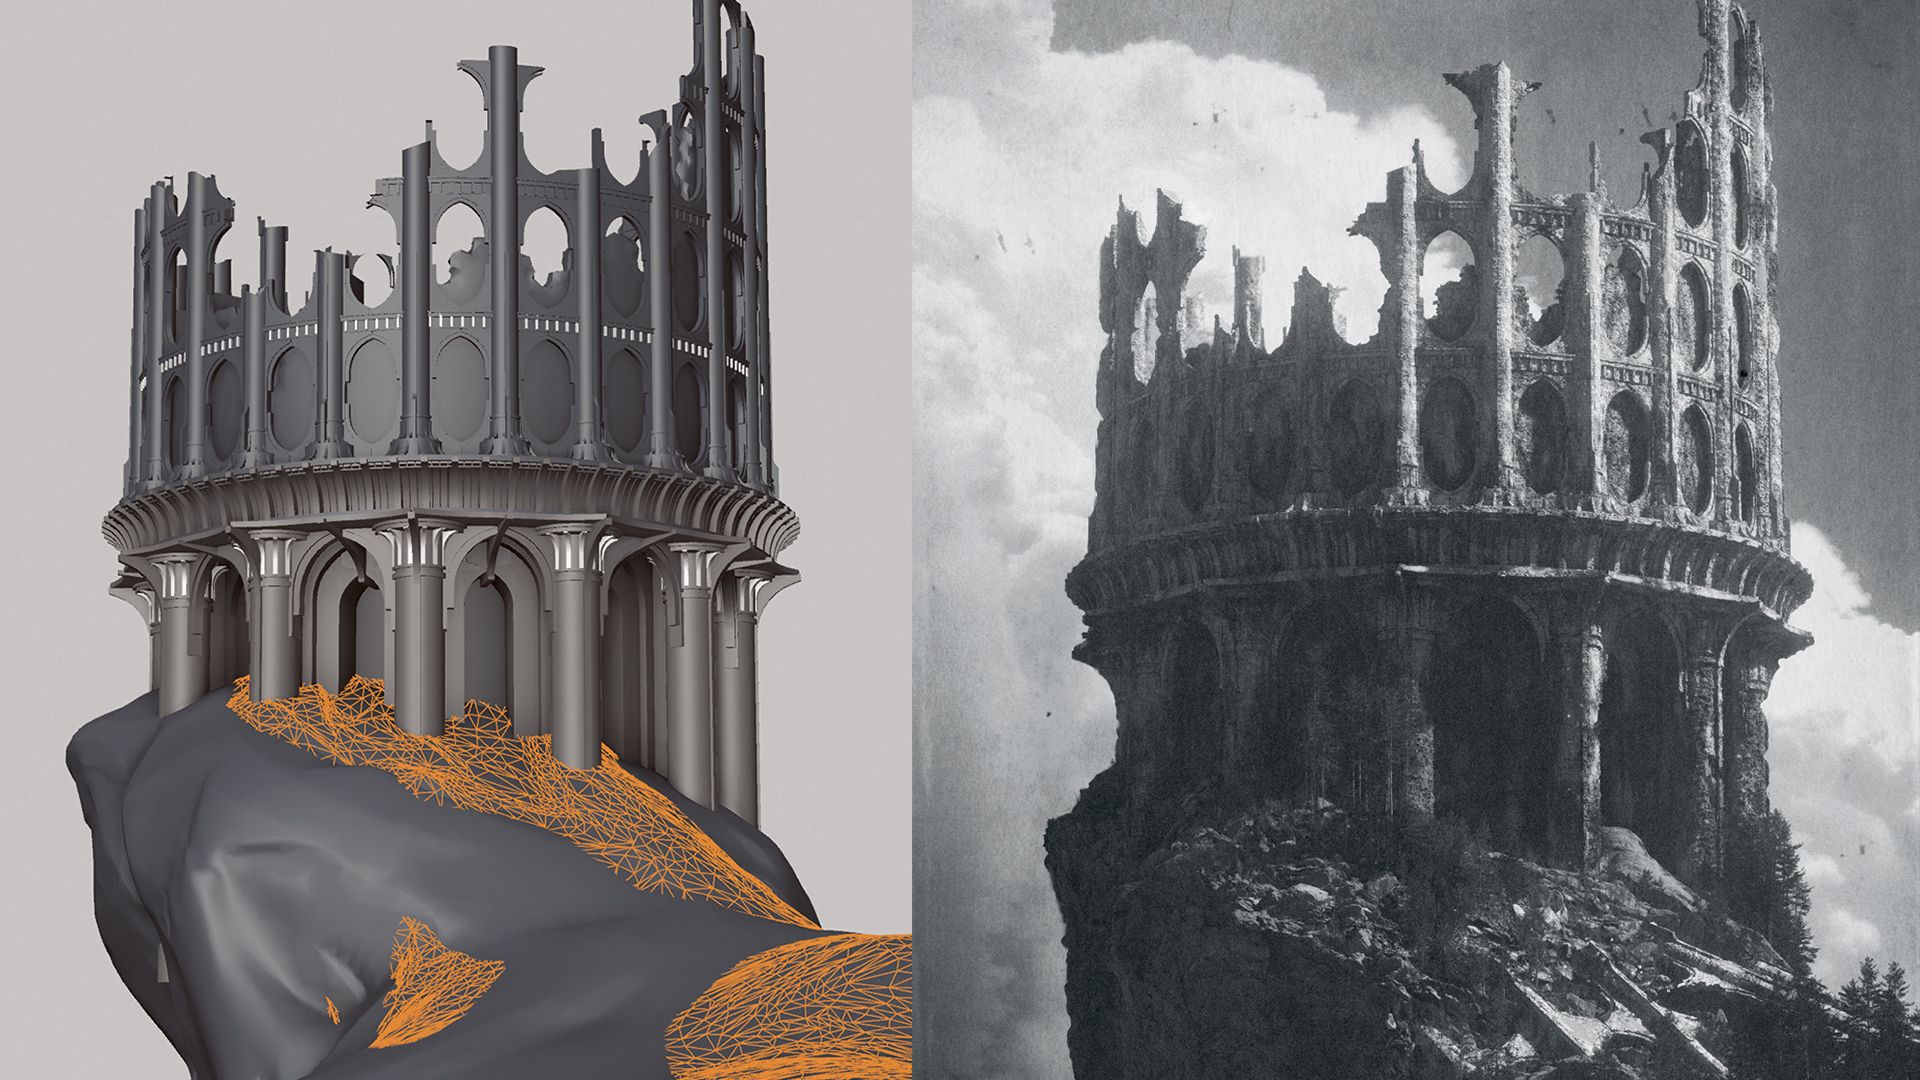
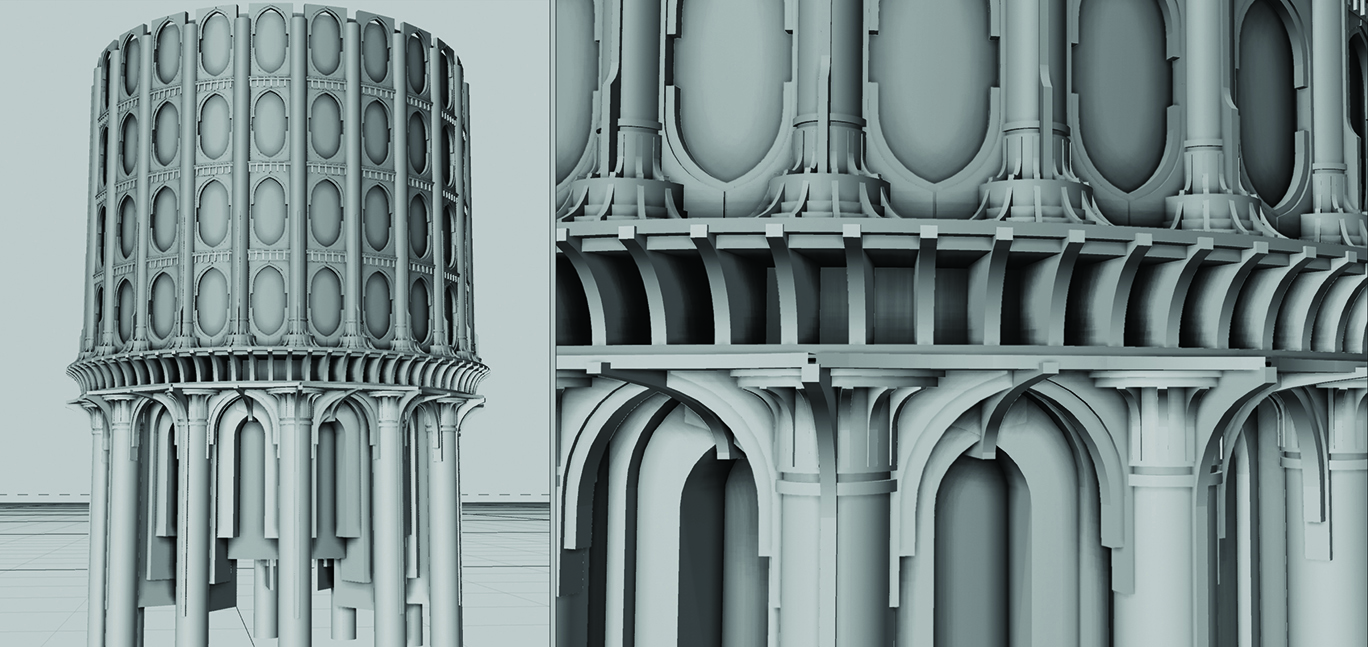
Rather than spending valuable time modeling individual bricks and ornate architectural features by hand, Moore champions efficiency through procedural geometry. Utilizing basic foundational shapes enhanced by displacement textures, he constructs the tower’s primary components. He employs symmetry for intricate archways and radial cloners for repetitive pillars, systematically assembling complex architectural modules without sacrificing performance.
04. Destroying the Tower
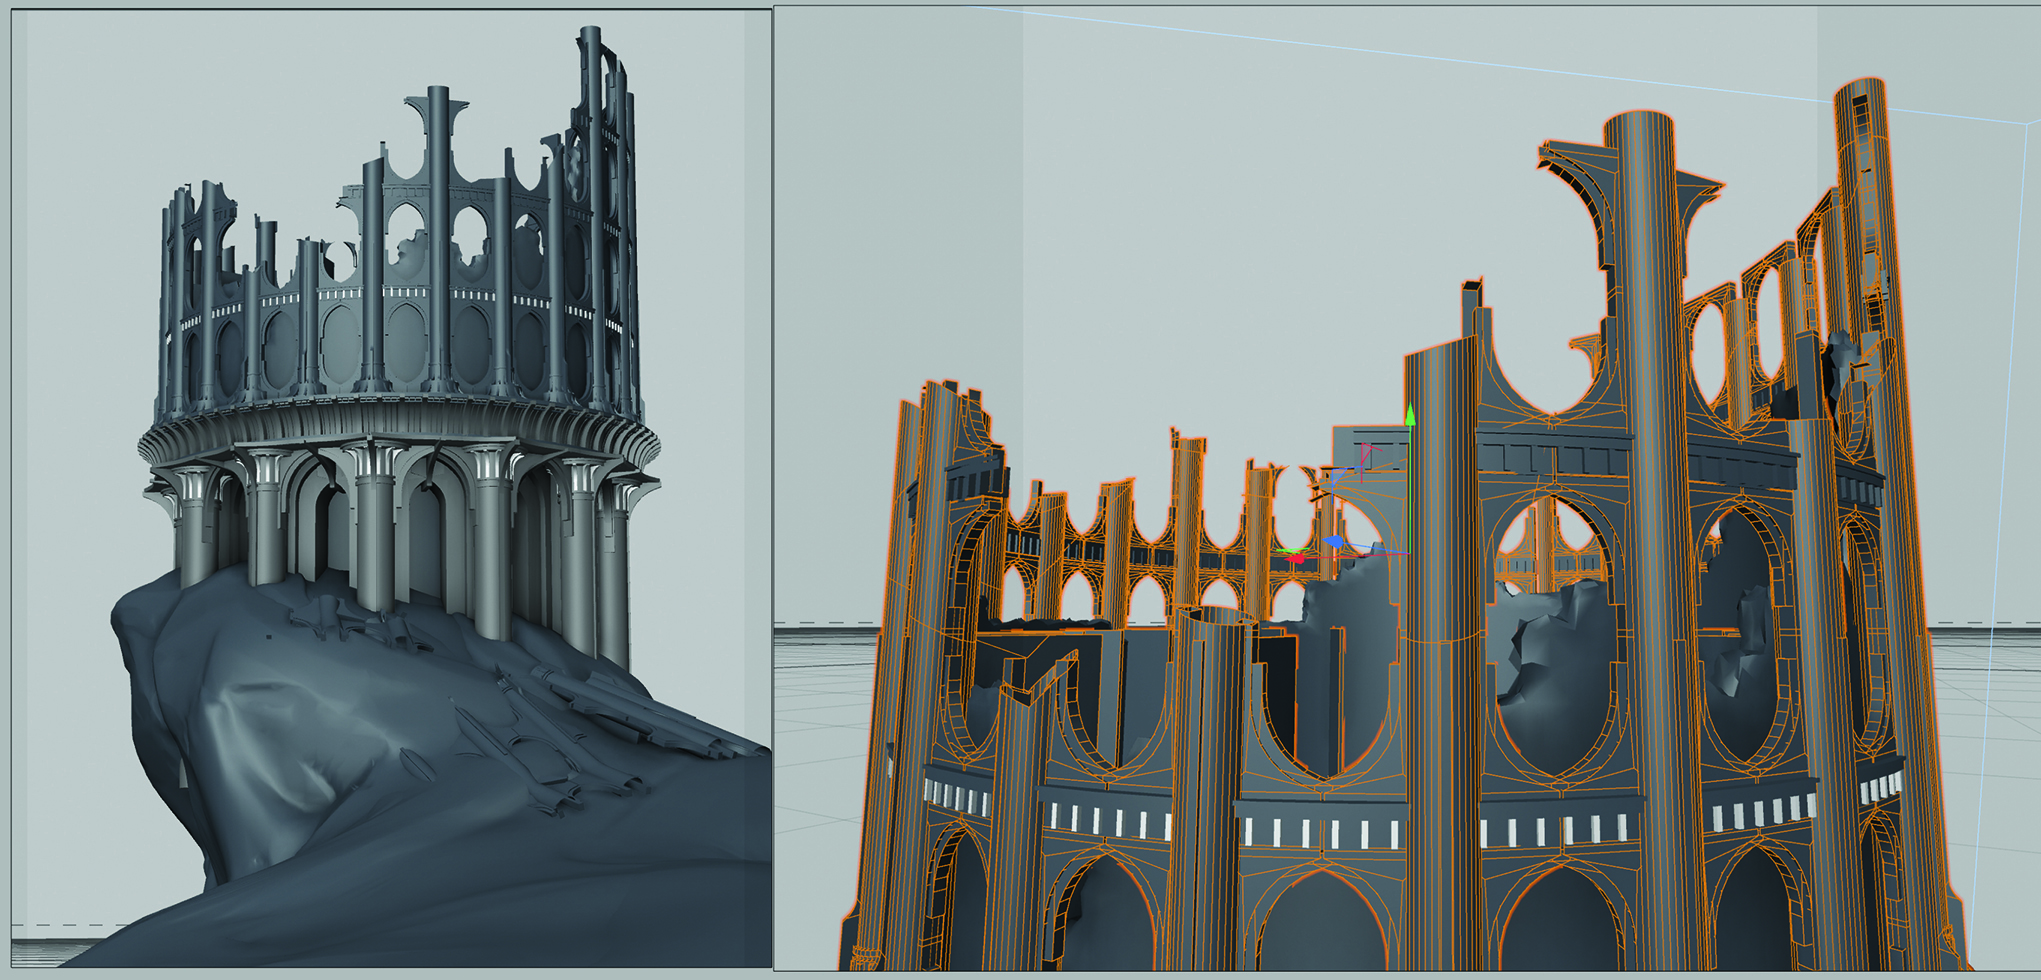
An ancient structure loses its narrative weight if it looks too pristine. To achieve a convincing aesthetic of decay, Moore subjects his digital creation to virtual ruin. Utilizing the knife tool and Voronoi fracture systems, he introduces calculated cuts into the geometry. Working loosely from his original thumbnail sketch, he lasso-selects specific architectural sections and deletes them, simulating structural collapse. He stresses the importance of spending adequate time on this phase to ensure that the resulting damage feels organic and physically plausible.
Phase III: Terrain Sculpting and Texturing
05. Sculpting the Terrain
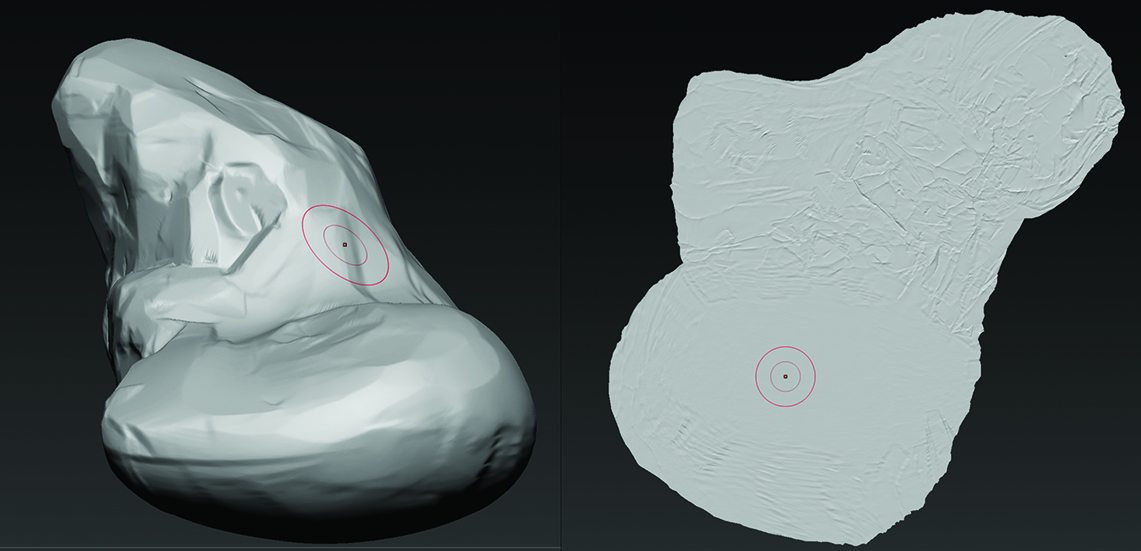
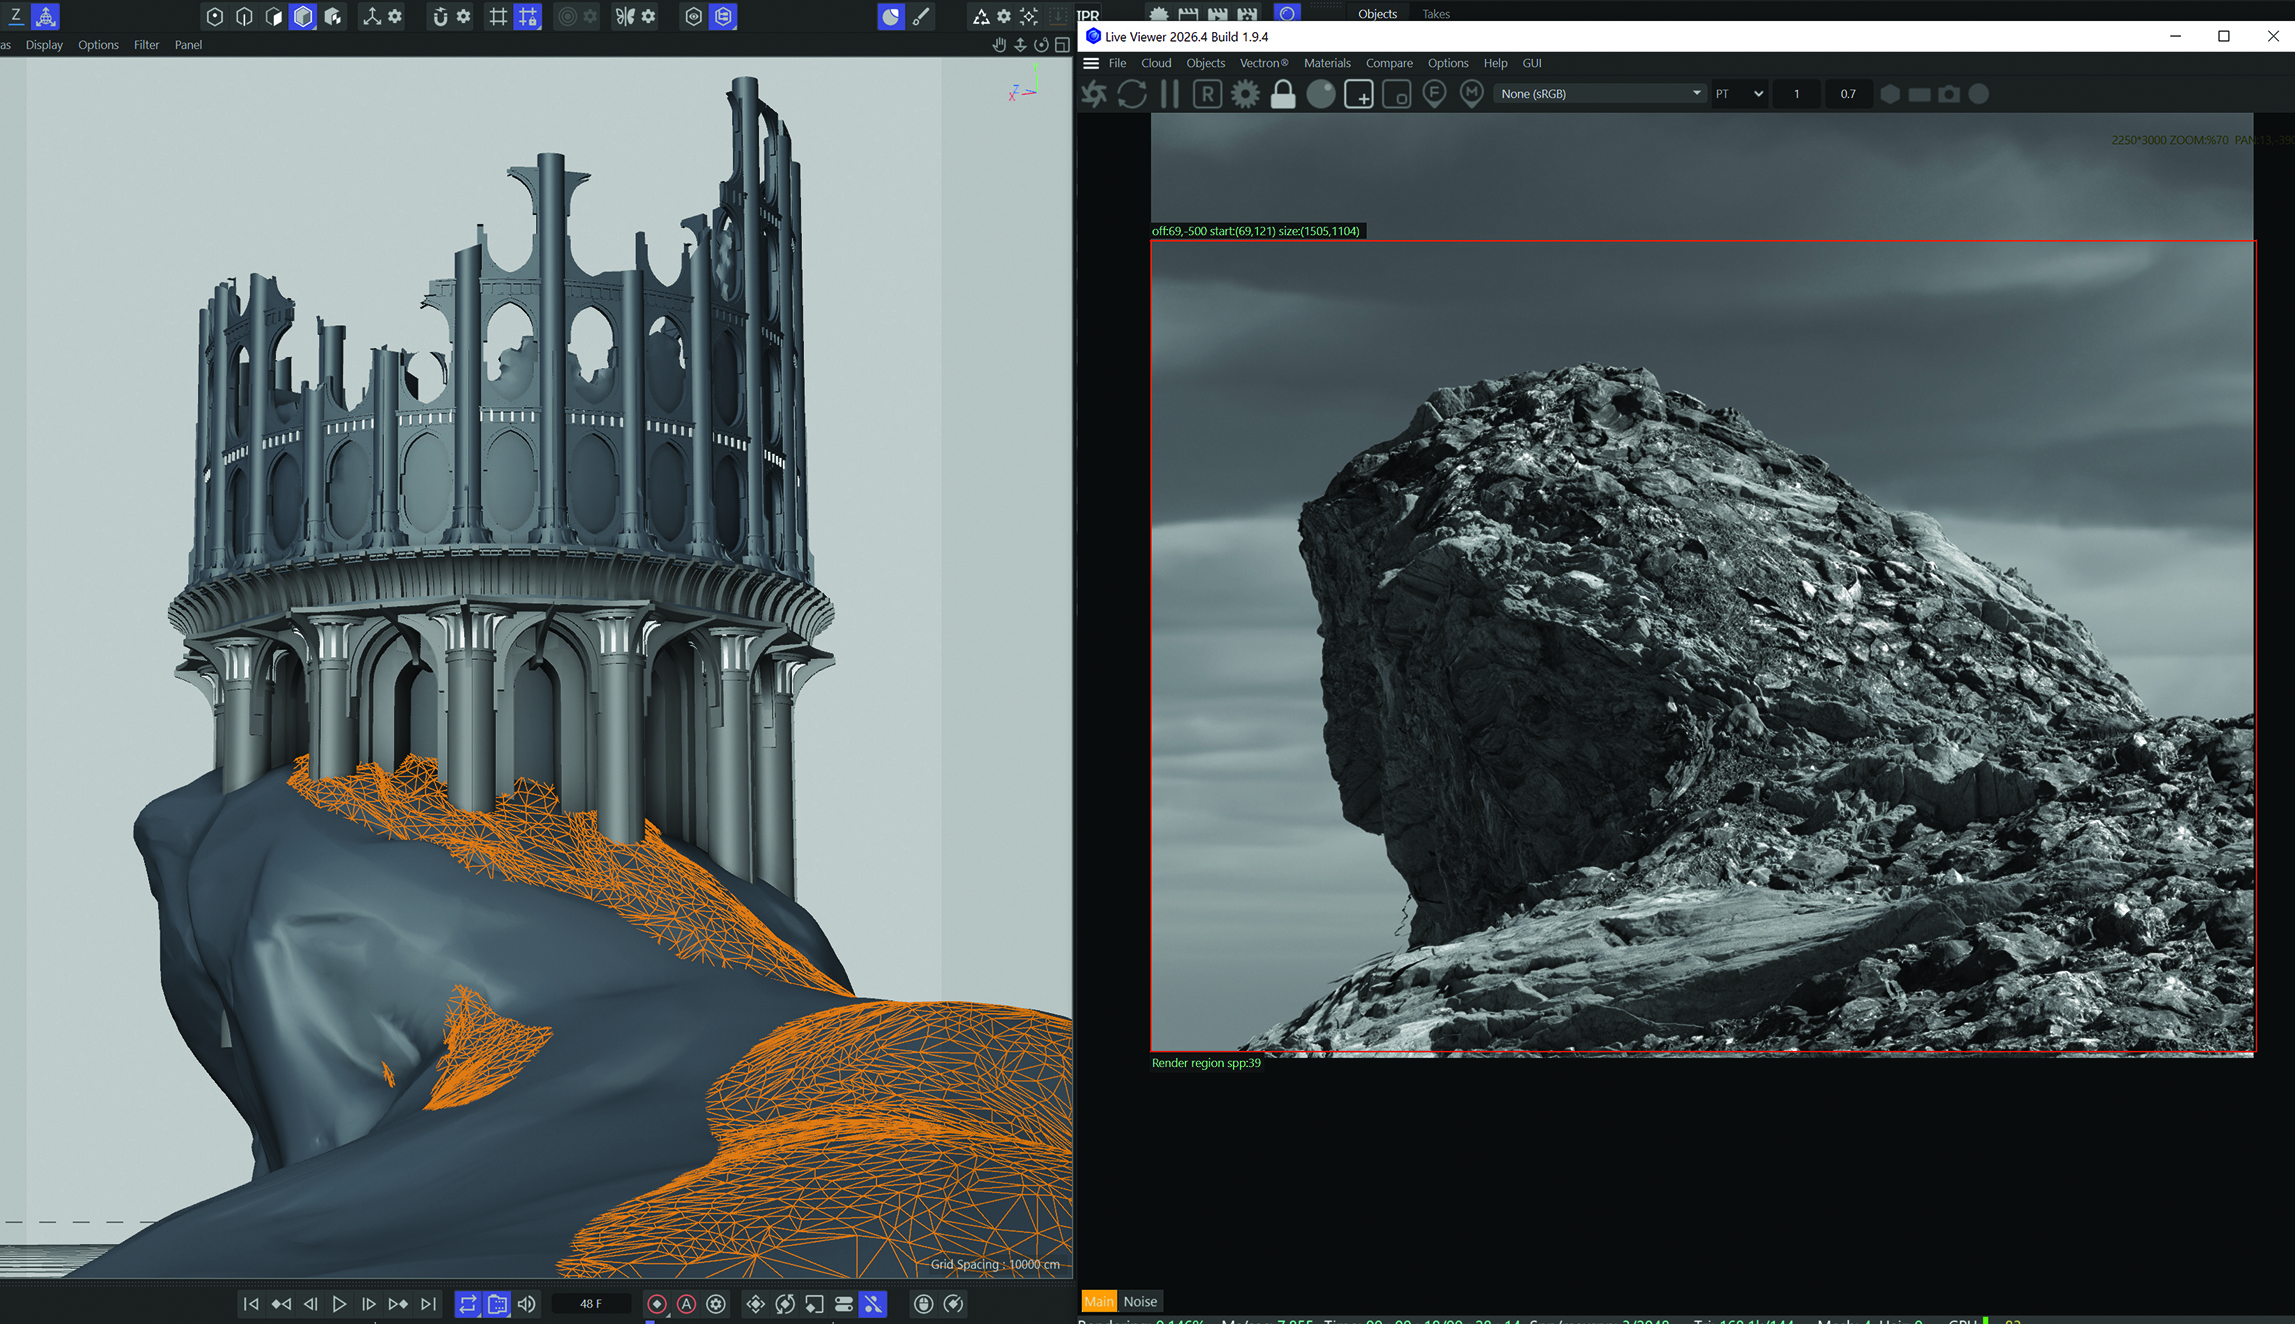
With the architectural focal point established, attention shifts to the surrounding landscape. Moore exports the basic terrain geometry into ZBrush to carve out larger geological formations. By keeping the sculpting phase focused on macro-shapes and relying on subsequent displacement textures for micro-details, he maintains a lightweight, responsive mesh. Before returning the asset to Cinema 4D, he generates clean UV maps to prevent severe texture stretching and displacement artifacting.
06. Texturing the Terrain
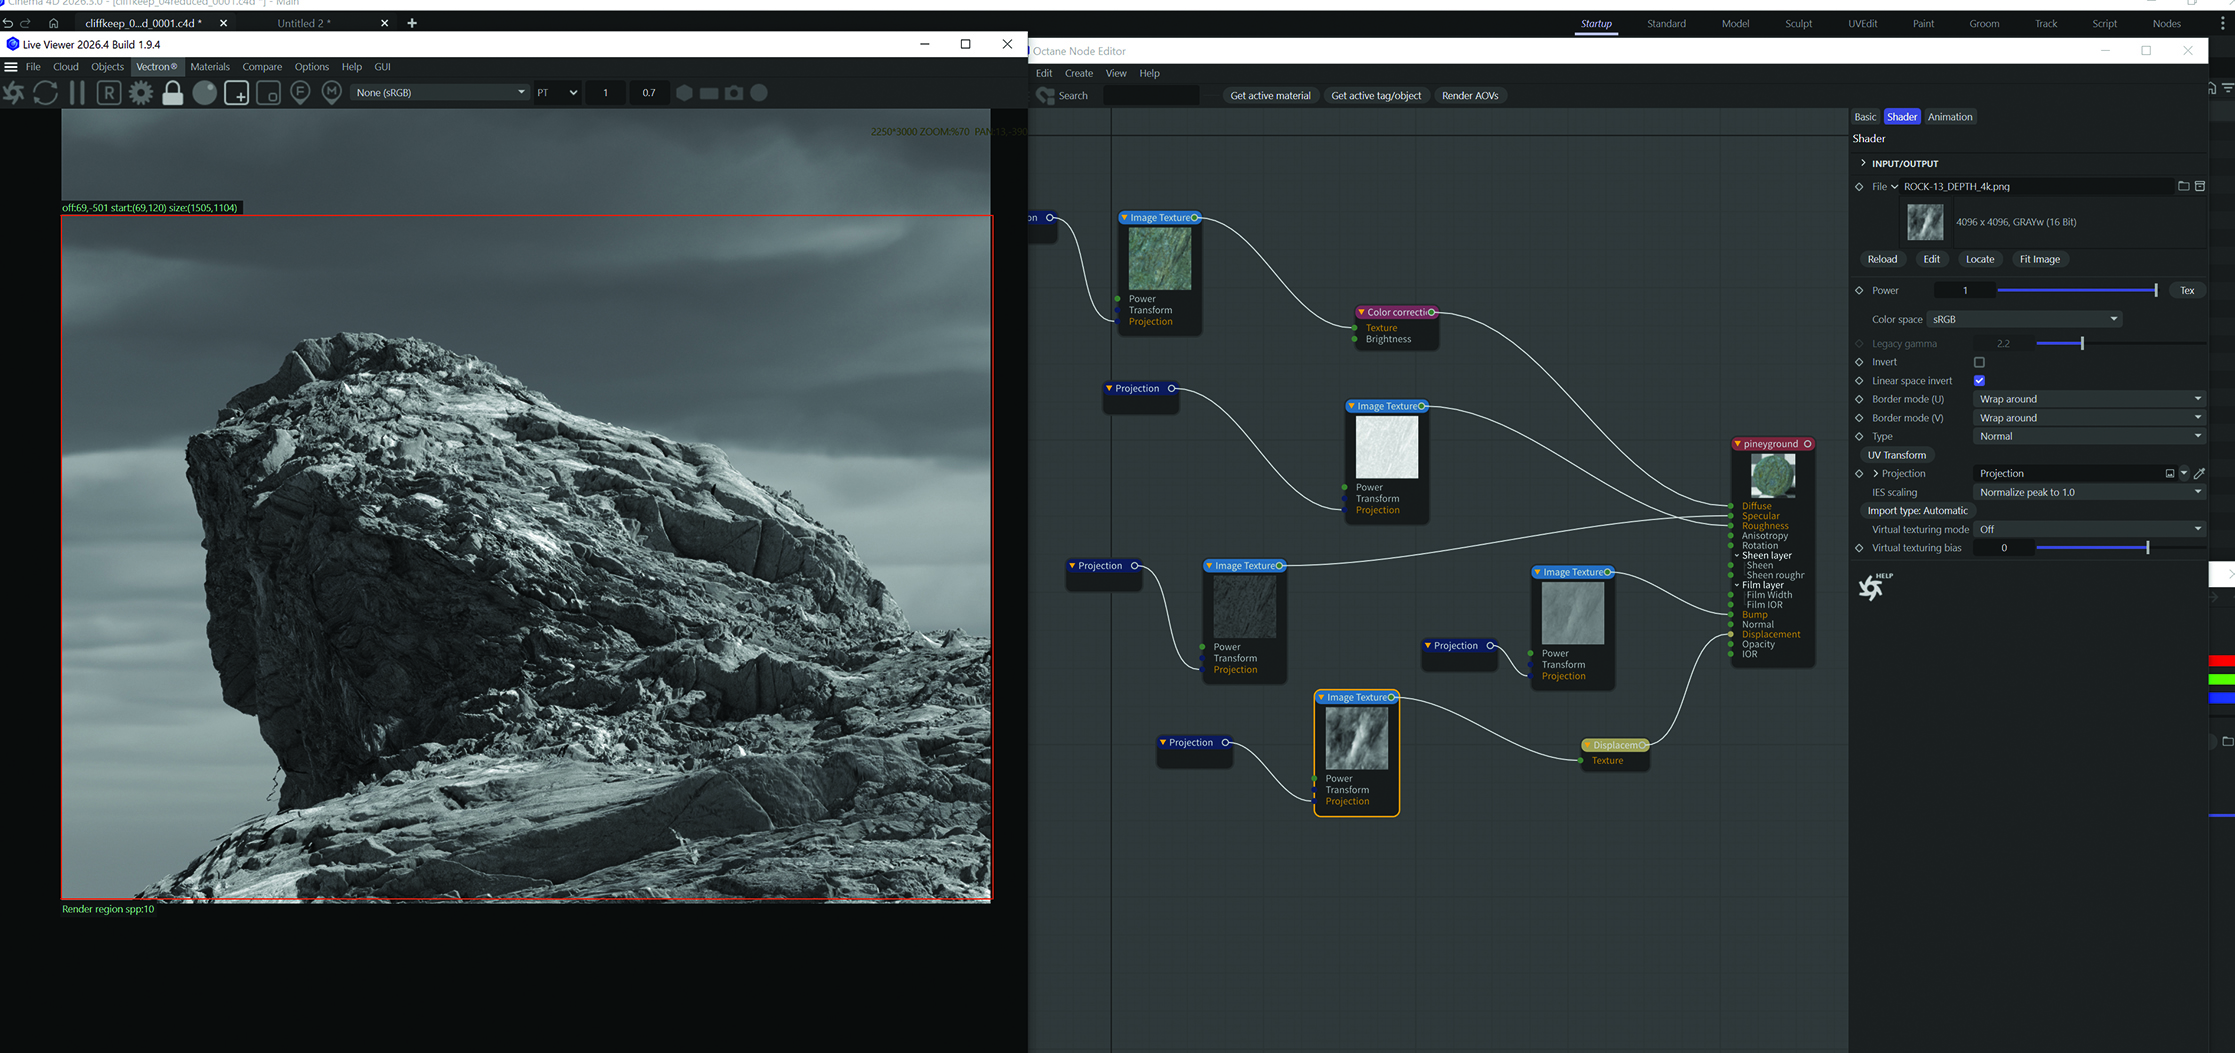
Back in Cinema 4D, Moore constructs the foundational material shader for the landscape. Utilizing tileable, photoscanned rock materials—sourced from platforms like Megascans—he dials up the displacement scale. This technique injects immense complexity and depth into an otherwise basic sculpt. Fine-tuning the material’s scale and UV offset parameters allows him to discover compelling natural silhouettes within the rock formations.
07. Adding Terrain Layers
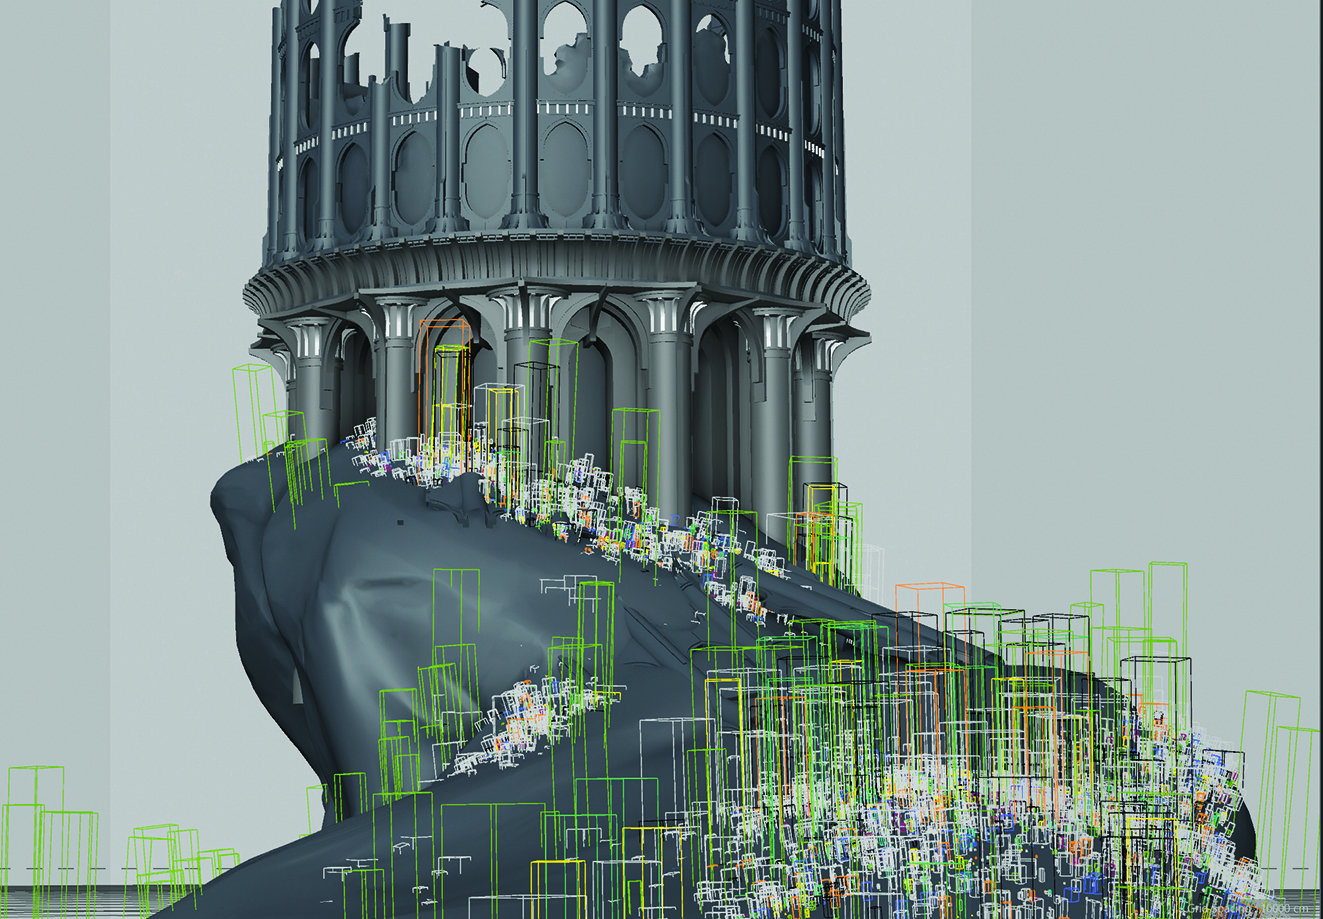
Nature is rarely uniform. To break up repetitive textures and achieve a realistic ground cover, Moore duplicates the terrain geometry, elevates it slightly along the Y-axis, and sculpts localized depressions. He assigns this secondary layer a distinct earthy, photoscanned soil material rather than a sheer cliff texture. The resulting render reveals a sophisticated, organic blend where rocky precipices transition naturally into debris-strewn earth.
08. Texturing the Tower
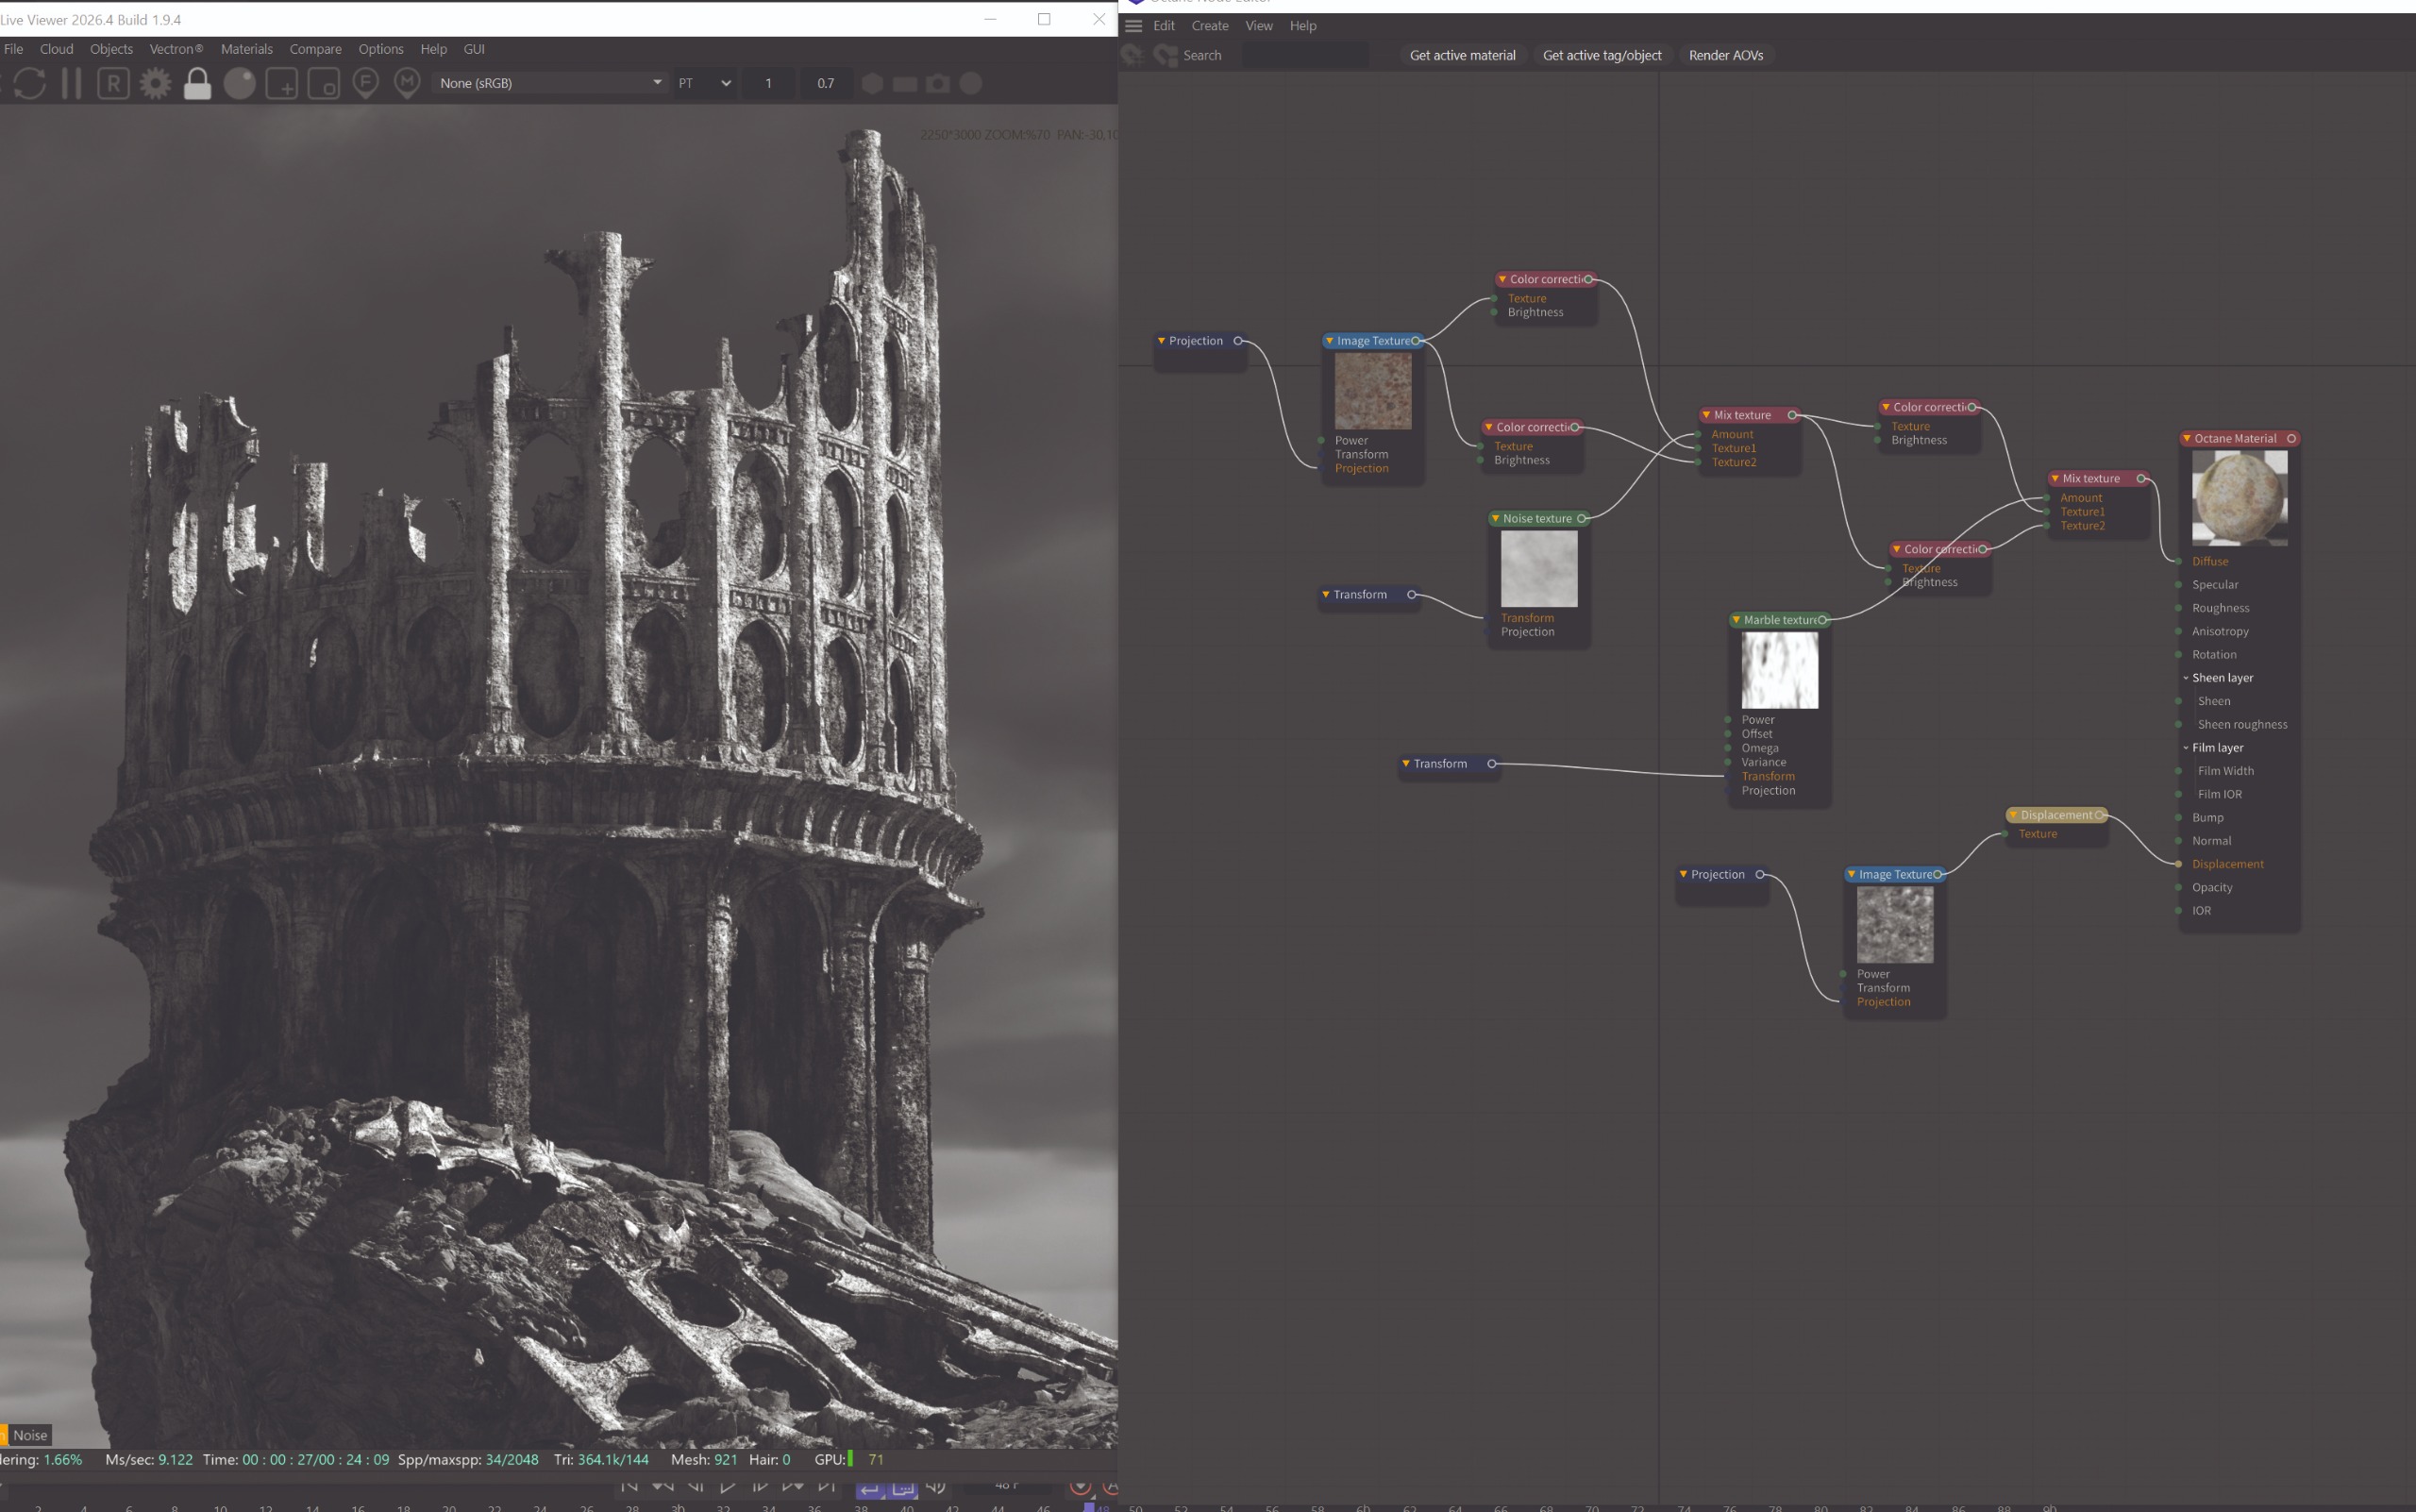
To unify the ruined tower with its rugged environment, Moore builds a dedicated stone-wall material powered by high-resolution displacement maps. To combat the monotony of tiled textures, he incorporates procedural noise layers driven by gradient marble textures. This setup automatically deposits procedural grime and dirt accumulation near the base of the structure, grounding the architecture firmly into the damp soil below.
Phase IV: Lighting, Environment, and Scattering
09. Including Lighting and Sky
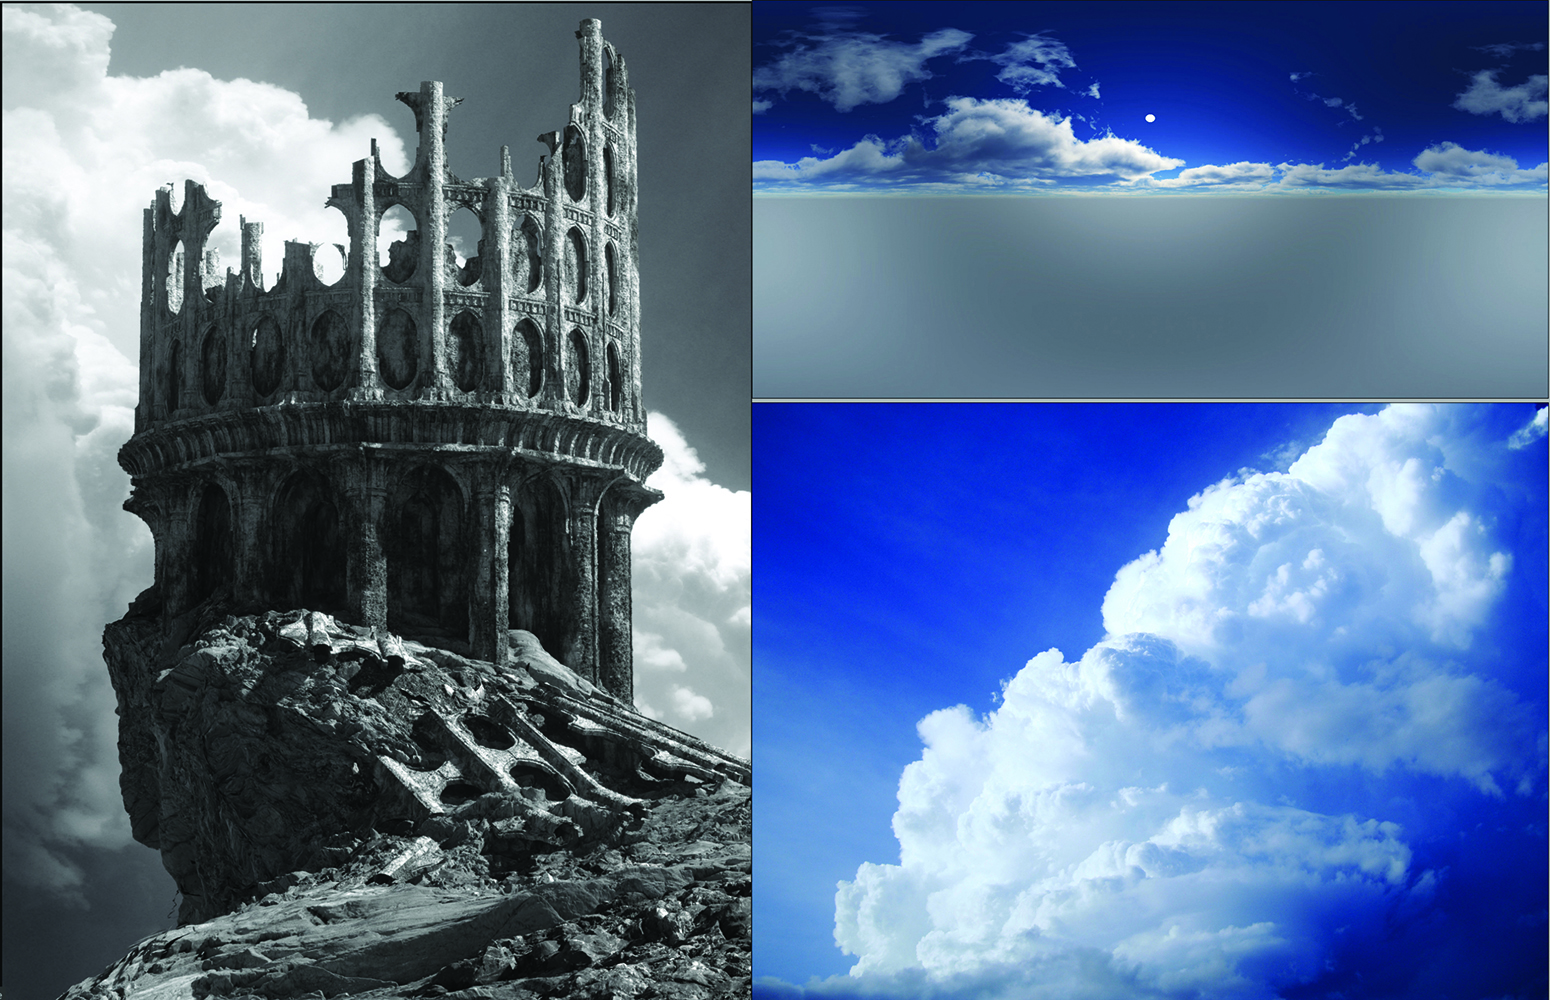
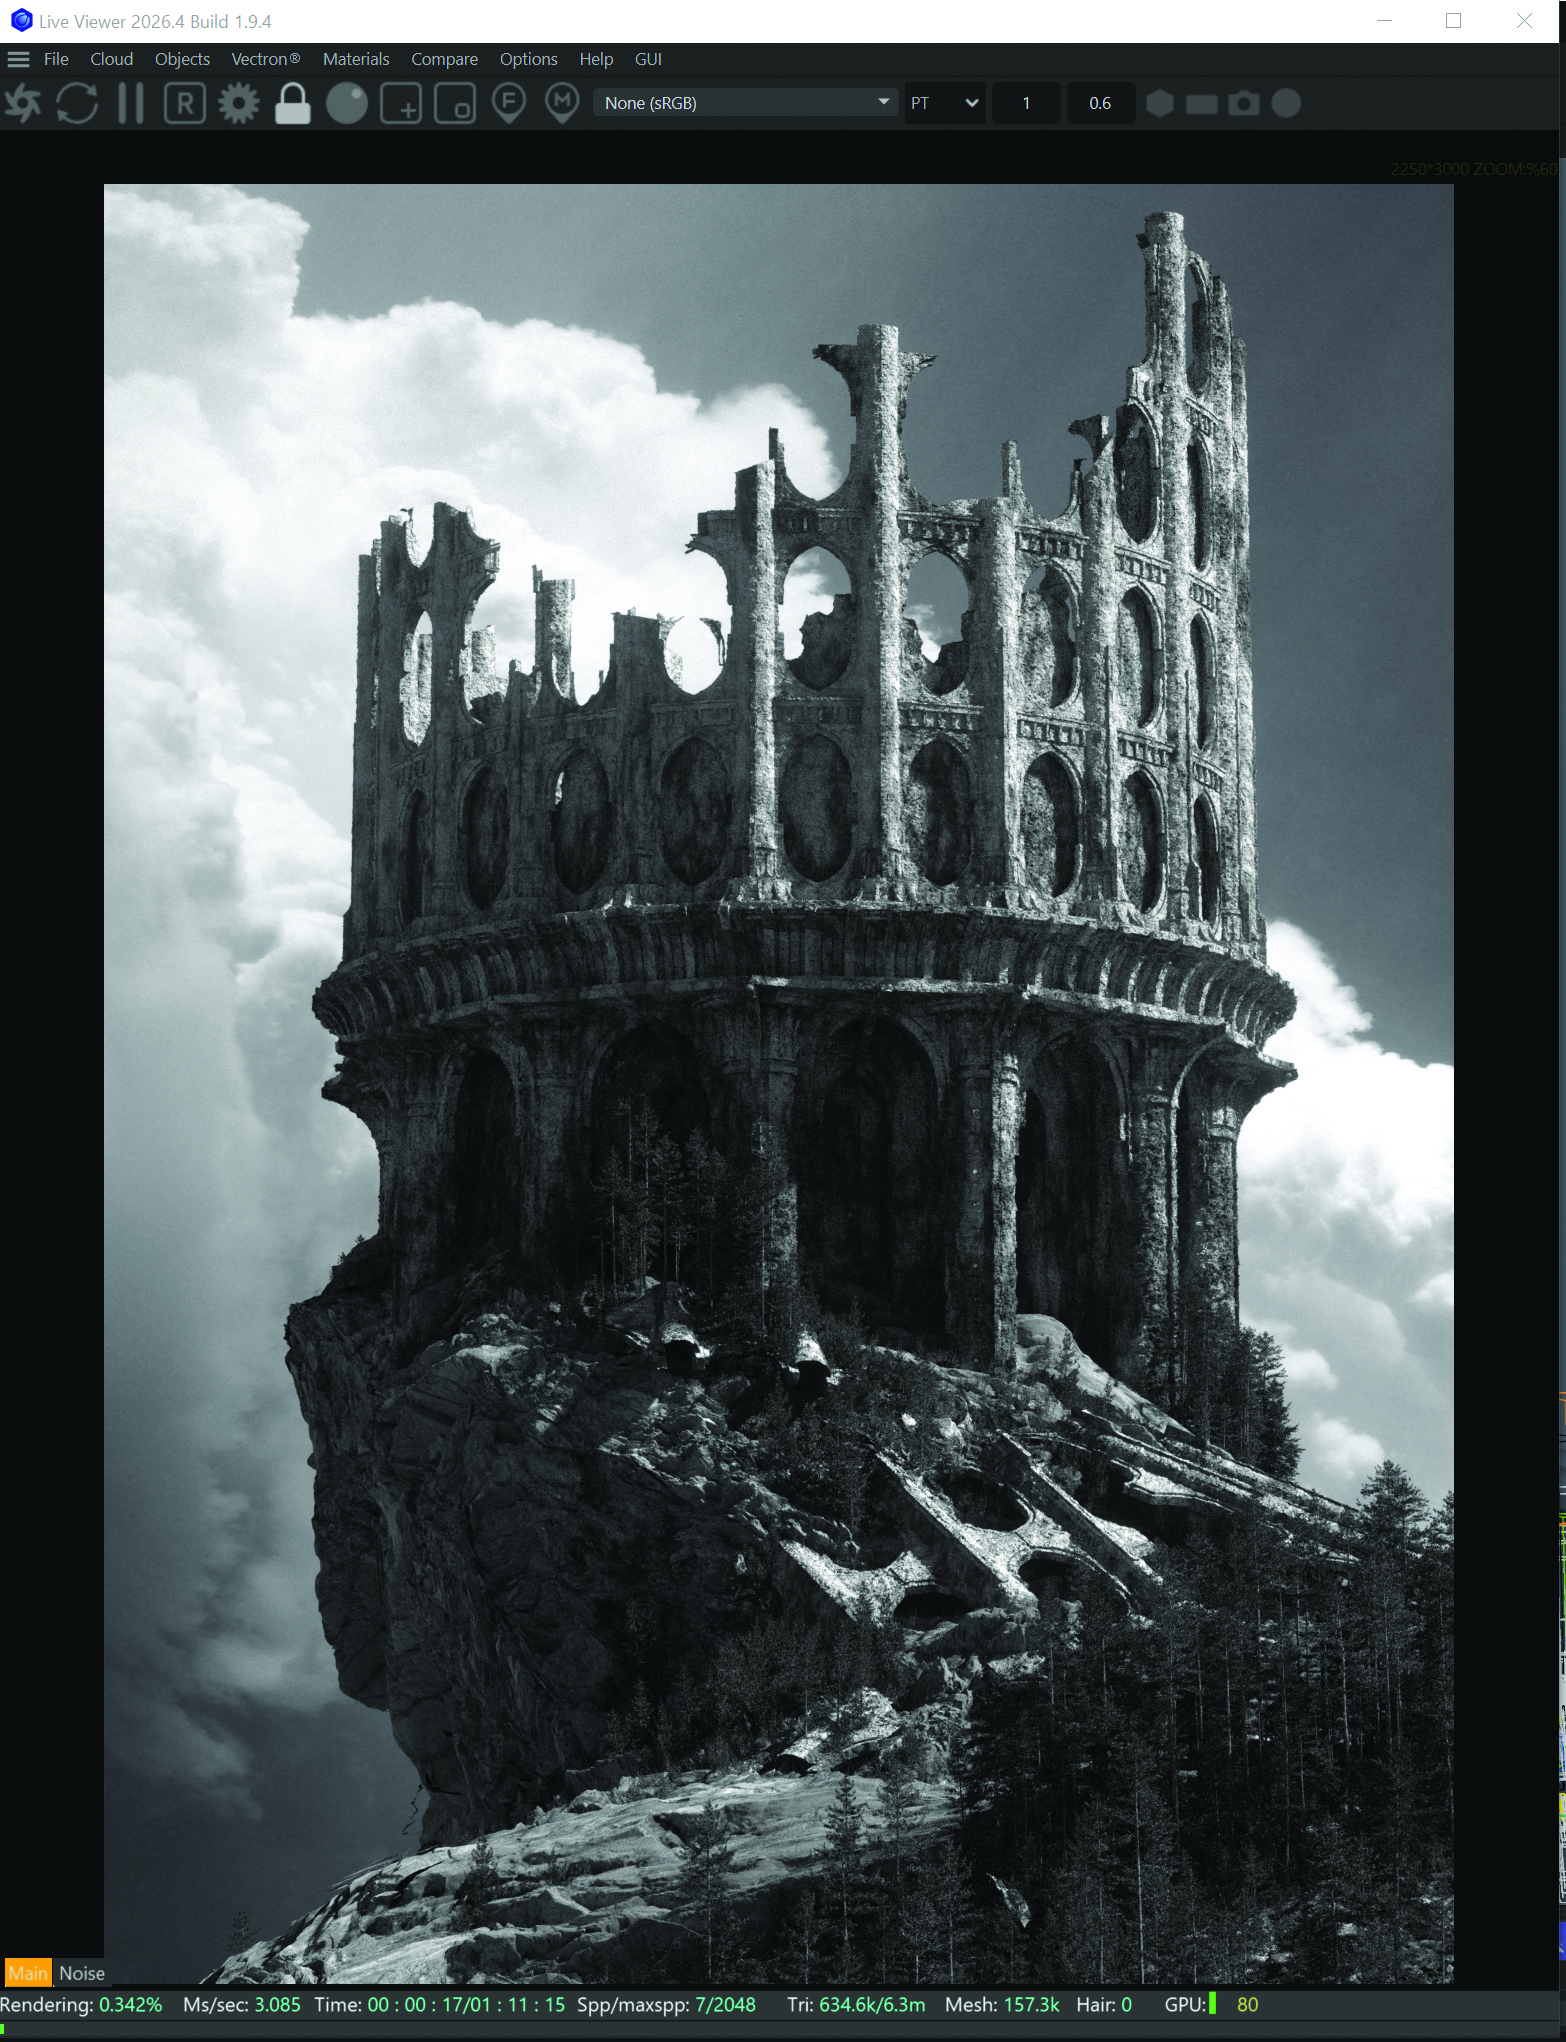
Lighting is the emotional heartbeat of any digital painting or 3D render. Developed in tandem with the texturing phases, Moore auditions various High Dynamic Range Imaging (HDRI) setups to establish a moody, atmospheric lighting scheme. He meticulously balances light and shadow to maximize contrast, visual readability, and dramatic tension. To complete the atmospheric composition, a strategically placed cloud plane is introduced to guide the viewer’s eye through the frame.
10. Adding Foliage to the Scene
To breathe life into the desolate landscape, Moore relies on pre-established asset libraries and scatter systems, such as Octane Scatter. By painting custom vertex maps directly onto the terrain mesh, he dictates precisely where pine trees, low-lying shrubs, and dense patches of grass will propagate. This node-based distribution system allows for dense, realistic ecosystems without bogging down the viewport rendering pipeline.
Phase V: Rendering and Digital Post-Production
11. Rendering the Scene
Given the computational weight of complex nature scenes containing millions of displaced polygons and scattered foliage instances, Moore approaches rendering modularly. By isolating sections of the scene, he can preview results rapidly, fine-tuning render settings and optimization passes. Alongside the primary beauty pass, he exports critical utility render layers, including a Z-Depth pass for atmospheric fog and depth-of-field control, a bloom pass, and an object ID mask for precise selections in post-production.
12. Making Adjustments in Photoshop
The raw render serves as a structural foundation rather than a finished product. Importing his layered passes into Adobe Photoshop, Moore embarks on the final artistic polish. He uses standard digital brushes to paint over stubborn displacement artifacts and awkward visual noise. To capture the nostalgic feel of an "old photo," he manipulates exposure levels, lifts the black point, adjusts background values, and integrates the bloom pass for a glowing, cinematic atmosphere.
13. Painting over Details
In a focused examination of foreground versus background clarity, Moore applies targeted digital painting techniques. He smooths out unwanted digital noise in distant elements while hand-painting crisp brick details into the silhouette of the foreground tower. Furthermore, introducing subtle depth-of-field blur to the background architectural elements successfully pushes them back in space, ensuring the foreground commands immediate visual dominance.
14. Adding Final Effects
The concluding step bridges the gap between digital rendering and traditional photography. Moore overlays vintage paper and photographic textures, blending them via vivid light and multiply layer modes while fine-tuning opacity. Finally, he flattens a duplicate of the entire image and applies a subtle film grain effect. This crucial touch eliminates the clinical, sterile sheen often associated with raw 3D output, cementing the artwork’s organic, timeless aesthetic.
Supporting Context & Metrics: The Modern 3D Pipeline
The workflow championed by Calder Moore highlights a broader paradigm shift in digital content creation. The traditional linear pipeline—where modeling, texturing, lighting, and compositing occurred in rigid, isolated silos—has been largely replaced by non-linear, procedural ecosystems.
Industry Software Integration
Modern digital artists frequently leverage hybrid software pipelines to maximize efficiency:
Cinema 4D: Renowned for its robust cloner systems, mograph animators, and seamless third-party render integration, C4D acts as the central hub for assembly and layout.
ZBrush: The undisputed industry standard for digital sculpting, utilized here for organic macro-detailing of terrain and rock faces.
Octane Render: A GPU-accelerated, unbiased path-tracer that allows artists to preview complex lighting and displacement in real-time, drastically reducing iteration cycles.
Adobe Photoshop: The traditional stronghold for digital paint-over, color grading, and final compositing passes.
Hardware Considerations
As demonstrated by Moore’s reliance on heavy displacement maps and scatter systems, modern environment art demands robust hardware specifications. High-end workstations equipped with dedicated drawing tablets (such as the XPPen and Huion models highlighted in industry gear guides) and powerful GPUs with substantial VRAM are no longer luxury items; they are operational necessities for handling massive polygon counts and ray-traced lighting calculations in real time.
Official Statements and Expert Insights
Reflecting on his creative choices during the project’s development, Calder Moore offered crucial insights into the psychological and technical hurdles digital artists face:
"Before diving into complex scenes like this, it’s a good idea to grab some inspirational images to build your visual palette; things like architecture, environment, lighting, composition, and mood. For these types of scenes, I like to pre-prep in 3D a bit, building up a library of foliage scatter systems and materials."
Addressing the common trap of creative paralysis when facing massive digital canvases, Moore emphasized the value of task management:
"These scenes can seem extremely daunting to make. I find that the best approach is to write down all your tasks that you need to do to make it: make tower, break tower, make ground, detail ground, etc., so instead of seeing a big task, you see twenty very manageable tasks."
Moore also highlighted the importance of staying flexible during the creative process, noting how accidental discoveries often define the final piece:
"A fun fact for this scene: it wasn’t originally going to be greyscale. I turned down the saturation during the lighting phase to check values, and immediately got inspired to keep it that way, as it helped push the mood I was looking for!"
Future Outlook: The Evolution of Environment Art
As rendering technologies advance with real-time ray tracing, neural rendering, and artificial intelligence-assisted asset generation, the role of the environment artist is evolving rapidly. However, masterclasses like Calder Moore’s demonstrate that foundational artistic principles—composition, lighting, narrative pacing, and efficient project management—remain irreplaceable.
The future of digital world-building will likely see even tighter integration between procedural generation and manual art direction. Artists who master the balance between technical automation (such as node-based scattering and displacement mapping) and traditional artistic sensibilities (such as digital painting and color grading) will lead the next wave of immersive visual storytelling. Whether creating moody fantasy ruins or sprawling sci-fi metropolises, the methodology remains clear: break down the overwhelming, embrace happy accidents in the lighting phase, and let strong narrative intent guide every polygon.