Executive Overview
While the macOS ecosystem has historically played host to a robust and dynamic marketplace of third-party screenshot utilities—each boasting specialized annotation tools, cloud integrations, and unique UI overlays—Apple’s native, built-in screen capture architecture has matured exponentially. For the vast majority of professionals, developers, content creators, and casual users alike, the default utility suite packaged within macOS is not merely adequate; it is exceptionally powerful.
Beyond the baseline capability of capturing a static image of the desktop, modern macOS versions offer enterprise-grade video recording capabilities, precise window isolation, multi-source audio capturing, automated workflow triggers, and deep hardware integration capable of bridging iOS and macOS environments. However, these advanced features remain largely obscured behind hidden preferences, obscure keyboard combinations, and under-documented Terminal commands.
Left to factory defaults, macOS treats screen captures with a blunt instrument approach: cluttering desktops with high-resolution PNGs, baking distracting drop-shadows into isolated windows, and offering no native indication of user intent during tutorials. For power users aiming to optimize productivity, conserve local storage, and produce publication-ready screencasts, mastering the hidden depths of the macOS screenshot utility is an essential operational requirement. This guide provides a comprehensive breakdown of the ten most transformative hacks, shortcuts, and configuration strategies designed to completely overhaul how you capture, manage, and process visual data on your Mac.
Detailed Chronology & Mechanics: Transforming the Capture Experience
To harness the full potential of the macOS screenshot utility, one must first dismantle the counterproductive default behaviors hardcoded into the operating system. The following chronological implementation steps outline how to transition from an amateur screen-grabber to an optimized power user.
1. Eliminating Desktop Clutter via Clipboard Routing
The average digital worker captures dozens of transient screenshots daily—temporary visual notes, error codes for IT departments, or snippets of text destined for an immediate Slack message. By default, macOS forces every single one of these instances onto the local disk as an individual file, creating a compounding digital landfill known colloquially as the "Desktop dump."
Statistical analysis of personal computing habits reveals that roughly 90% of all captured screenshots possess a functional lifespan of less than five minutes. Preserving them as dedicated storage artifacts is inefficient. By routing captures directly to the system clipboard, users can instantly paste images into communication channels, text editors, or design suites without generating persistent files.
- Full Screen to Clipboard: Execute
Command-Control-Shift-3. - Selected Region to Clipboard: Execute
Command-Control-Shift-4, click, and drag over the target zone.
To eliminate muscle-memory errors that save files to the disk, advanced users often purge the conflicting default global shortcuts entirely. Navigate to System Settings > Keyboard > Keyboard Shortcuts > Screenshots, and uncheck "Save picture of screen as a file" and "Save picture of selected area as a file." This forces an intentional reliance on the clipboard workflow, fundamentally changing how transient data is handled.
2. Strategic Redirection of Default Storage Locations
For the remaining 10% of screenshots that must be archived as permanent files, relying on the Desktop as a default repository is an ergonomic misstep. When high-volume capture sessions occur, desktop iconography becomes entirely obscured by cascading .png thumbnails.
To re-route this pipeline:

- Trigger the master overlay by pressing
Command-Shift-5. - Navigate to Options > Other Location….
- Designate a dedicated archival directory (e.g., a "Screenshots" folder inside your Documents directory or a cloud-synced vault).
- For immediate post-capture retrieval, open Finder, locate your newly designated folder, and drag it directly to the Trash/Stack side of the Dock. This provides one-click access to your archives without cluttering your primary workspace.
3. Engineering Precision: Stripping Window Shadows
When capturing a single application window (Command-Shift-4, followed by the Spacebar and clicking the target window), macOS automatically wraps the asset in a high-contrast drop shadow and a subtle transparent boundary. While aesthetically pleasing for general presentations, this shadow introduces unwanted transparent padding that wreaks havoc in graphic design layouts, documentation wikis, and software UI comparisons.
While pressing and holding the Option key while clicking a window will strip the shadow on a case-by-case basis, power users require a systemic solution. By injecting a command into the macOS Terminal, the operating system can be instructed to permanently suppress drop shadows across all single-window captures:
defaults write com.apple.screencapture disable-shadow -bool true; killall SystemUIServerTo revert to factory settings should design requirements change, simply substitute true with false and re-run the script.
4. Direct Dock Integration for Visual Navigation
Keyboard shortcuts are undeniably efficient, but the expanding feature set of macOS introduces a cognitive load of memorization. For users who prefer a graphical interface, the core Screenshot utility (Screenshot.app) can be permanently pinned to the Dock.
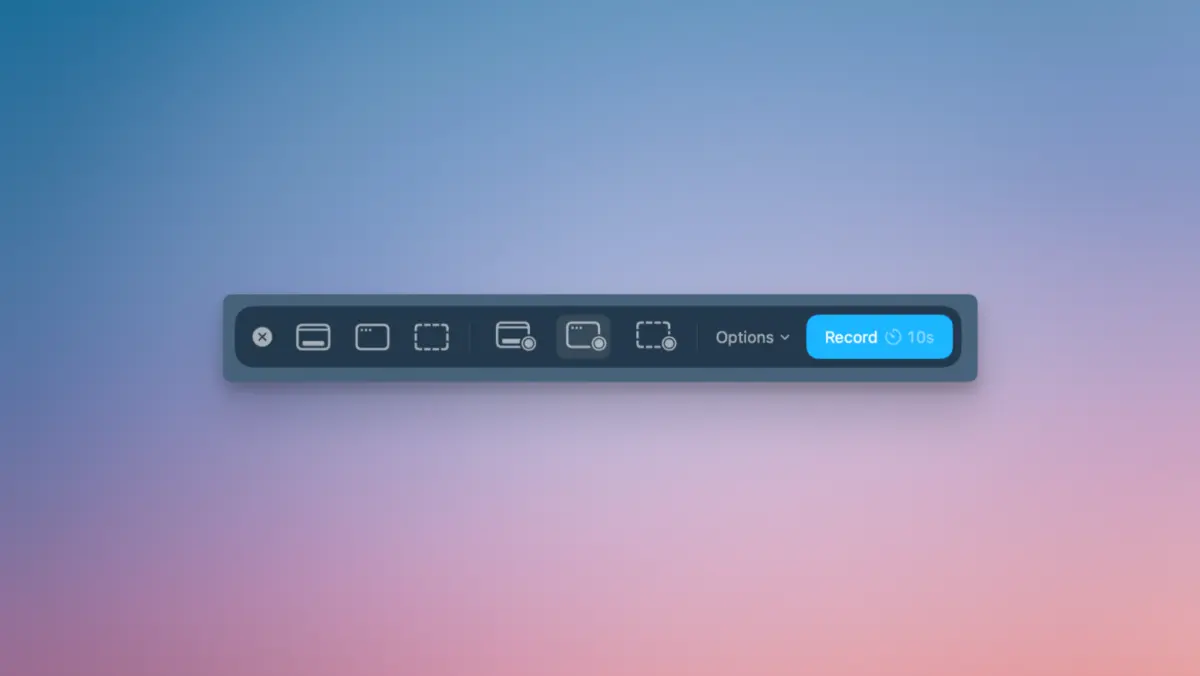
Navigate via Finder to Applications > Utilities, locate the Screenshot application icon, and drag it directly onto the Dock. Clicking this icon invokes the master control toolbar (Command-Shift-5), exposing every capture, record, and configuration setting in a clean, unified HUD (Heads-Up Display) without requiring mnemonic gymnastics.
Supporting Context & Metrics: Advanced Screencasting and Cross-Device Capture
Beyond static imagery, macOS functions as a robust recording studio. Whether producing instructional screencasts for distributed teams or troubleshooting family members’ devices, the built-in recording engine offers granular controls that rival dedicated commercial software.
| Feature / Hack | Keyboard Shortcut / Path | Primary Use Case |
|---|---|---|
| Master HUD Overlay | Command-Shift-5 |
Centralized access to all photo/video modes. |
| Timed Capture Delay | Command-Shift-5 > Options > Timer |
Eliminates race-conditions for hover states & menus. |
| Visual Click Tracking | Command-Shift-5 > Options > Show mouse clicks |
Educational screencasts and remote support. |
| Microphone Injection | Command-Shift-5 > Options > [Mic Selection] |
Narrative recording and high-end tutorial creation. |
| Format Transmutation | Terminal type jpg script |
Aggressive local storage preservation. |
Mitigating Race Conditions with Capture Timers
Capturing transient UI states—such as cascading dropdown menus, hover tooltips, or dynamic animations—often results in frustrating failed attempts due to the physical lag of pressing multi-key shortcuts.
By engaging the Timer feature via the Command-Shift-5 overlay, users can program a 5- or 10-second countdown. This delay provides an essential temporal buffer to prep complex workspace configurations, position the cursor, and deploy interactive menus precisely before the shutter snaps.
Telemetry and Instruction: Revealing Mouse Clicks
When constructing instructional documentation or troubleshooting remote endpoints for colleagues, raw video often fails to communicate the exact physical inputs being performed. Enabling the Show mouse clicks parameter (found under Command-Shift-5 > Options) overlays a distinct visual ripple or graphical indicator every time a physical click is registered on the canvas. This subtle telemetry drastically reduces confusion during technical walkthroughs.

Synchronized Multi-Source Audio Screencasting
Creating polished video walkthroughs no longer demands third-party digital audio workstations (DAWs) or screen recorders. The native macOS recording engine seamlessly merges high-framerate system capture with external and internal microphone tracks. By pairing a 10-second setup timer with a dedicated USB or XLR microphone selected from the options pane, creators can execute single-take, studio-grade narrated screencasts with zero post-production audio synchronization required.
Cross-Architecture Integration: Recording iOS via macOS
Modern content creators frequently face operational bottlenecks when attempting to capture mobile application workflows. Apple’s mobile operating system (iOS) intentionally restricts native screen recording within specific secure environments (such as DRM-protected media apps or sensitive banking interfaces).
To bypass these operational blocks, macOS can act as a capture bridge for iOS devices:
- Wireless Method: Utilize the native iPhone Mirroring application packaged within modern macOS iterations, establishing a secure wireless handoff and capturing the mirrored window using standard macOS screenshot tools.
- Hardware-Tethered Method: Connect the iPhone directly to the Mac via a physical USB/Lightning or USB-C cable. Open QuickTime Player, navigate to File > New Movie Recording, and select the connected iOS device from the telemetry drop-down menu adjacent to the record button. This routes the raw hardware feed directly into the Mac’s recording architecture, circumventing mobile software-level capture restrictions.
Official Technical Specifications & Storage Optimization
As display technologies advance toward high-pixel-density Retina and Pro Display XDR standards, the sheer physical footprint of captured imagery scales dramatically. By default, macOS encodes screenshots in the Portable Network Graphics (PNG) format. While PNG guarantees lossless compression and razor-sharp typographic fidelity, it produces massive file sizes. A single full-screen capture on a high-resolution Apple Silicon Mac can easily consume upwards of 20 to 30 megabytes.
For power users managing hundreds of captures per week, this rapidly degrades available SSD storage capacity. To enforce aggressive storage conservation, the operating system’s compression profile can be fundamentally altered via the Terminal, forcing native captures into the Joint Photographic Experts Group (JPG) format:
defaults write com.apple.screencapture type jpg; killall SystemUIServerTechnical Trade-Off Analysis
- PNG (Default): Lossless, massive file sizes, pristine text clarity, zero compression artifacts. Ideal for UI design audits, code snippets, and publication graphics.
- JPG (Optimized): Lossy compression, exceptionally small file sizes, potential degradation of fine sub-pixel typographic edges. Ideal for rapid bug reporting, transient sharing, and storage-constrained environments.
Should compression artifacts begin to compromise legibility, administrators can instantly revert the system back to the default lossless standard by executing:
defaults write com.apple.screencapture type png; killall SystemUIServerFuture Outlook
As Apple continues to iterate upon the macOS architecture—deeply integrating artificial intelligence frameworks like Apple Intelligence, unified cross-platform toolbars, and advanced spatial computing workflows—the role of screen capture is undergoing a paradigm shift. Static images and linear video recordings are rapidly evolving into dynamic, semantic data objects.
Future iterations of macOS will likely transcend traditional rasterized pixel-grabbing, moving toward semantic screen understanding where captured elements are instantly indexed, textually searchable, and contextually aware of underlying application logic. However, until automated intelligent capture becomes the ubiquitous baseline, mastering the underlying mechanical levers of the macOS screen capture utility remains an indispensable competency. By implementing the clipboard routing strategies, drop-shadow purges, storage optimizations, and advanced recording hacks detailed in this guide, users can reclaim absolute control over their digital workspace, eliminating friction and maximizing operational efficiency.